The Savory Secret to Perfect Witch Finger Grissini Texture
Halloween treats often lean sweet, but there's a particular magic in a savory creation that balances spooky visuals with irresistible flavor and, most importantly, impeccable texture. Enter the
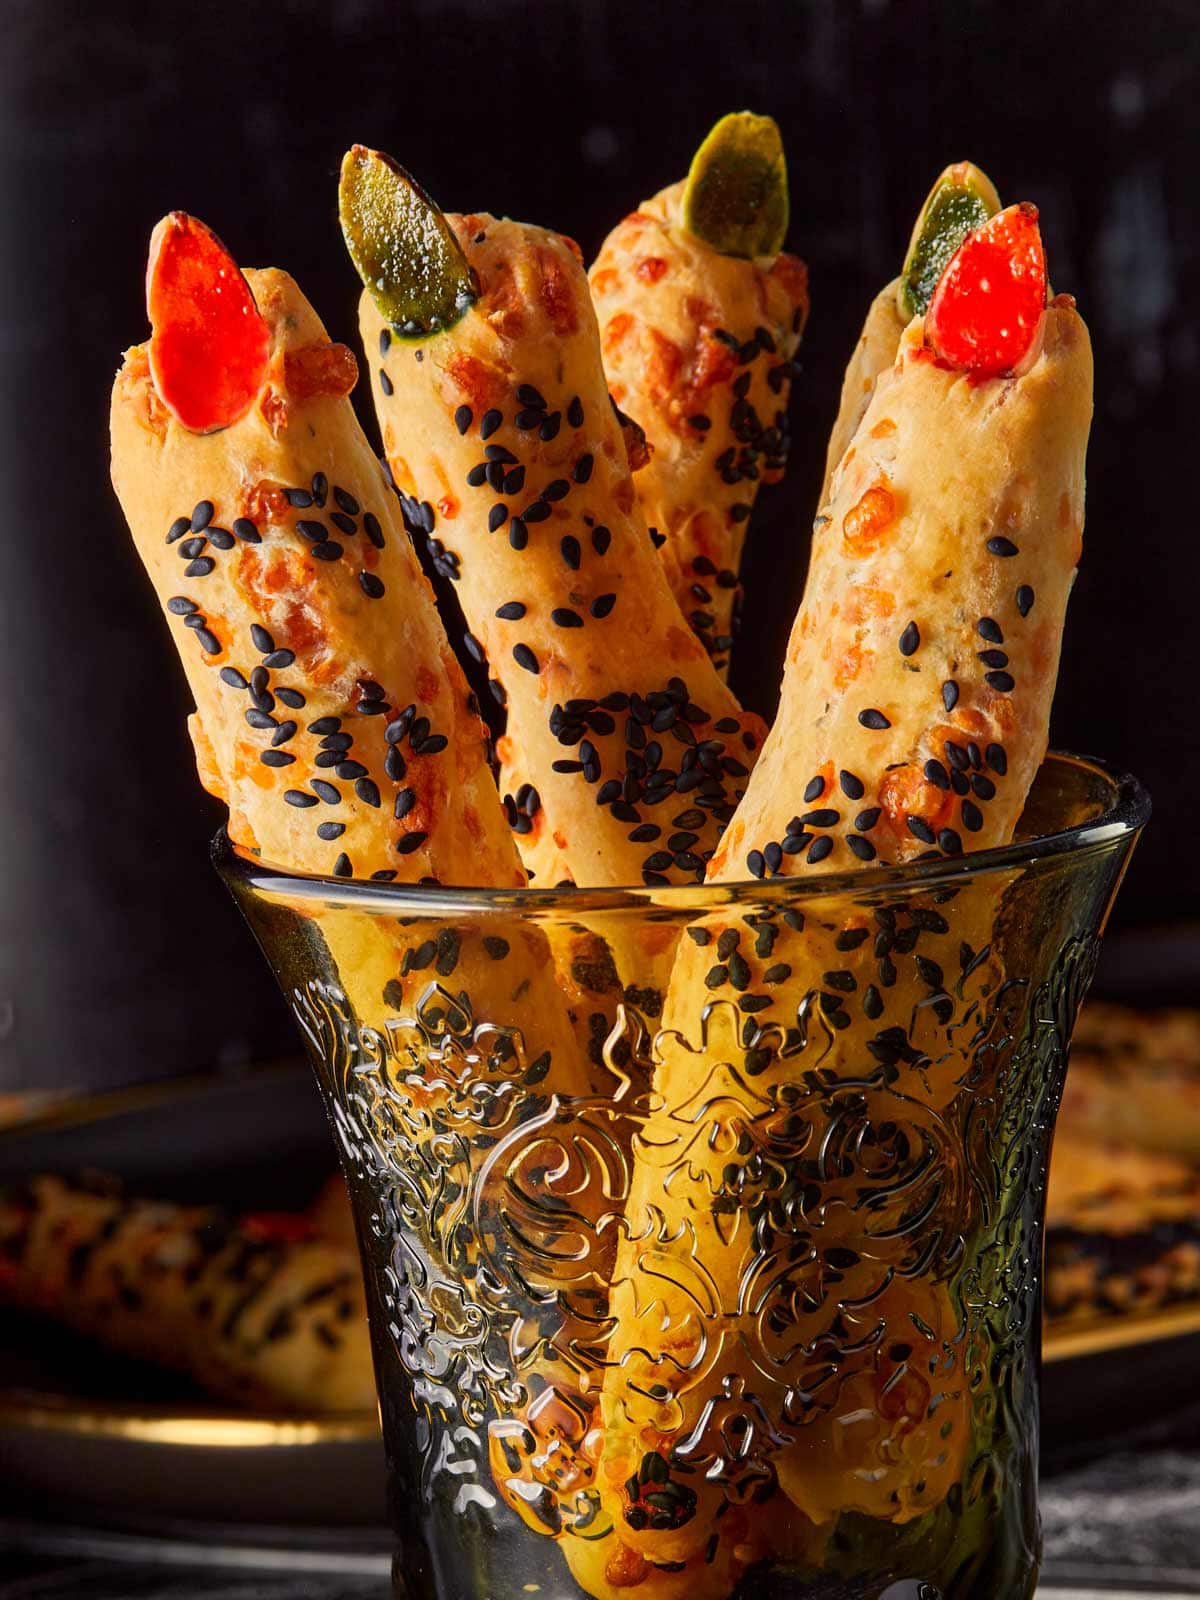
Witch Finger Grissini: a playfully eerie take on the classic Italian breadstick that has taken seasonal gatherings by storm. Beyond their ghoulish charm—complete with almond "nails" and black sesame "skin"—lies a carefully crafted culinary experience. The true secret to their popularity isn't just their appearance, but the delightful interplay of a crisp exterior and a tender, savory interior that makes each bite utterly addictive. Achieving this perfect balance is an art, and it starts with understanding the role of each ingredient and every step in the baking process.
The Alchemy of Ingredients: Crafting the Ideal Grissini Bite
The foundation of any great breadstick, particularly one as distinctive as
Witch Finger Grissini: Creepy-Chic Breadsticks for Parties, lies in its ingredients. Each component plays a vital role in sculpting that sought-after texture – a harmonious blend of crunch, tenderness, and robust flavor.
- The Flour & Cornstarch Power Duo: While all-purpose flour provides the necessary structure, the true textural wizardry comes from cornstarch. This often-overlooked ingredient is the unsung hero, actively inhibiting excessive gluten development, which can lead to a chewy, dense breadstick. Instead, cornstarch works to lighten the crumb, yielding a delicate yet sturdy grissini that snaps crisply without crumbling apart. It’s the difference between a brittle stick and one with a satisfying, resilient crunch that holds its shape.
- Fats for Flakiness and Flavor (Oil & Cheese): A touch of olive oil, or another neutral oil, is crucial. It imbues the dough with a buttery richness, contributes to that appealing golden sheen, and aids in creating a slightly flaky texture upon baking. But the savory depth, which is just as important as the texture, largely comes from generous amounts of grated cheese folded directly into the dough. As the grissini bake, the cheese melts, infusing every fiber with salty, umami notes and further contributing to a tender, slightly chewy interior that contrasts beautifully with the crisp exterior. This isn't just about flavor; the fat from the cheese also influences the overall mouthfeel.
- Liquids for Moisture and Structure (Egg & Milk): A single egg acts as a binder, enriching the dough and providing structure that helps the grissini maintain their shape during rolling and baking. Milk adds essential moisture, ensuring the interior remains tender and preventing the sticks from becoming excessively dry. Together, they create a dough that's pliable enough for shaping yet robust enough to withstand the oven's heat.
- Black Sesame Seeds: More Than Just Decoration: While undeniably dramatic and visually crucial for the "charred skin" effect, black sesame seeds are not merely decorative. They adhere to the exterior, adding an assertive, toasted nuttiness and a subtle textural crunch that enhances the overall sensory experience. Their slight bitterness also provides a welcome counterpoint to the rich, cheesy dough.
Mastering the Art of Shaping and Finishing for Visual and Textural Impact
Once the dough is perfectly mixed—a single-bowl affair that requires no complicated kneading or long proofing—the transformation from simple dough to spooky grissini begins.
- The Roll: Achieving Consistent Crunch: The secret to uniformly crisp grissini lies in consistent shaping. Roll small portions of dough into thin, finger-like sticks, aiming for an even thickness throughout. Fingers that are too thick will bake inconsistently, potentially remaining soft in the middle, while those too thin might become overly brittle. Don't be afraid to make them a little "knobbly" and irregular – it adds to the eerie, realistic finger aesthetic!
- The Sesame Seed "Skin": After shaping, each grissini is rolled in black sesame seeds, leaving one end bare for the "nail." Pressing gently ensures the seeds adhere well, forming that distinctive, textured "skin" that contributes both to the visual and the subtle roasted flavor.
- The Almond "Nail" & Egg Yolk Glaze: A sliced almond is carefully pressed into the bare tip, its shape mimicking a sharp, witchy nail. To give these nails a truly haunting manicure and a glossy finish, a final brush of tinted (or plain) egg yolk is applied. This egg wash creates a theatrical, slightly hardened surface on the almond, making it stand out even more. For an extra golden and slightly crispier exterior on the entire grissini, you can brush the whole stick with an egg wash before baking.
The Oven's Role: Baking for Unforgettable Crispness
The baking process is where the grissini's texture truly comes alive. It's a delicate balance between achieving a golden color, maximum crispness, and a tender interior.
- Optimal Temperature (350°F / 180°C): Baking at a steady 350°F (180°C) is paramount. This moderate temperature allows the grissini to bake through evenly, creating a uniform golden color without scorching the delicate dough or the sesame seeds. It's hot enough to encourage the development of a crisp crust but not so hot that it prevents the interior from cooking gently, locking in that tenderness.
- The Golden Window: Keep a close eye on your grissini as they bake. They should turn lightly golden. Overbaking can lead to an overly dry and brittle product, while underbaking will result in a soft, flabby grissini that lacks that satisfying snap.
- The Cooling Factor: This step is often overlooked but is absolutely critical for texture. Once removed from the oven, allow the Witch Finger Grissini to cool completely on a wire rack. They will firm up and become even crisper as they cool, achieving that resilient crunch that doesn't crumble easily when picked up.
- Re-crisping on Demand: One of the beauties of these grissini is their ability to be prepared ahead of time. If you want to serve them warm or find they've lost a little crispness after sitting out, a few minutes in a warm oven (around 300°F/150°C) will bring them back to their crunchy glory.
Elevating Your Witch Finger Grissini: Tips for Success and Savory Variations
Beyond the basic recipe, a few clever tricks and creative twists can make your Witch Finger Grissini truly stand out.
- Make-Ahead Magic: The dough is surprisingly cooperative! You can prepare it up to 24 hours in advance. Simply wrap it tightly and store it in the refrigerator. Just remember to let it come to room temperature before shaping for easier handling. This makes them an ideal candidate for party prep, allowing you to bake them fresh just before guests arrive.
- Serving Suggestions: While they are utterly delightful on their own, Witch Finger Grissini truly shine when paired with complementary dips. Think a vibrant marinara, a creamy garlic aioli, a spicy sriracha mayo, or even a rich cheese fondue for an extra indulgent experience. They also make a fantastic accompaniment to a seasonal charcuterie board or as a fun dipper for a hearty autumn soup.
- Flavorful Variations: Don't be afraid to experiment with the savory profile:
- Spicy Fingers: Add a pinch of cayenne pepper or red pepper flakes to the dough for a subtle kick.
- Herb-Infused: Incorporate finely chopped fresh rosemary, thyme, or dried Italian herbs for an aromatic twist.
- Cheese Swaps: While Parmesan or Gruyère works wonderfully, consider a sharp cheddar for a bolder flavor, or even a smoked Gouda for an intriguing depth.
- Seed Sensations: Although black sesame is essential for the "witchy" look, for everyday grissini, you could try poppy seeds, white sesame seeds, or even everything bagel seasoning for a different texture and flavor profile.
- Alternative "Nails": If almonds aren't available or for allergy considerations, a cashew half or even a pumpkin seed could serve as a unique "nail," offering a slightly different visual and textural element.
In conclusion, the savory secret to perfect Witch Finger Grissini texture lies not in a single magical ingredient, but in a thoughtful combination of elements. It's the cornstarch that ensures that delicate crispness, the fats and cheese that deliver a tender richness, and the precise baking temperature that locks it all in. By understanding these nuances, you can transform a simple dough into a spellbinding snack that delights both the eyes and the palate. So, this Halloween, go beyond mere visuals and embrace the culinary craftsmanship that makes these spooky breadsticks a truly unforgettable treat.